This article will guide you through the installation and configuration steps for Putty Key Generator (PuTTYgen), which is part of Putty Suite.
The procedure mentioned in this tutorial is tested on:
| OS | Windows 7 |
(I) What is PuTTYgen?
PuTTY Key Generator, a.k.a. PuTTYgen (an RSA and DSA key generation utility), is a free utility which generates keys for use with PuTTY SSH client, PuTTY authentication Pageant, and other programs in the PuTTY line. It can also convert OpenSSH private key files into PuTTY’s format, that allows you to connect to your server from a Windows machine, with the added security that SSH keys provide.
(II) Installation Steps:
a) Peagent is part of Putty Installer package which can be downloaded from link.

b) OR it can also be downloaded separately as well from link.

(III) Starting PuTTYgen:
a) Go to Windows-Start -> All Programs -> PuTTY -> PuTTYgen.

b) Following screen would appear once Puttygen start.

(1) Generate a new public/private key pair.
(2) Load an existing private key.
(3) Type of key to generate (SSH-2 RSA/SSH-2 DSA), select SSH-2 RSA as it more secure and difficult to crack.
(4) In the Number of bits in a generated key field, specify either 2048 or 4096 (increasing the bits makes it harder to crack the key by brute-force methods).
c) Once you click on generate button following screen appears. Generate some randomness by moving the mouse over the blank area, move the mouse over the area highlighted in the screenshot below.

d) Once the key has been generated you should see a screenshot similar to the one below:

(1) The OpenSSH server require your public key to be given to it in a one-line format before it will accept authentication with your private key. Copy, Paste and Save it to a new file for later use (This key is in Unix format).
(2) Comment field so you can better identify the key in the future.
(3) Passphrase for your key, which will be used to encrypt the key on disk. Otherwise, other people with access to your private key can use it freely.
(4) Confirm Passphrase.
(5) Save your public key.
(6) Save your private key.
Note: (*) You should save the key in location which you can only access it.
(*) Private Key generated by Puttygen has .ppk format.
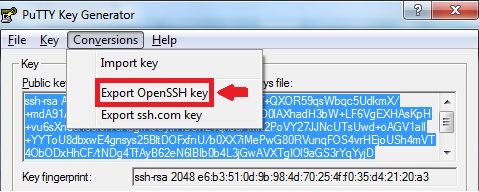
e) We can also copy the same private key in OpenSSH format using “Conversions -> Export OpenSSH key” option (Optional Step):
(IV) Adding Public Key on the Server
a) Login to destination server.
b) Create SSH folder if it does not exists.
mkdir ~/.ssh
chmod 0700 ~/.ssh
c) Copy and paste the Public Key generate above in Point (1).
vim ~/.ssh/authorized_keys
chmod 0644 ~/.ssh/authorized_keys
Related Posts:
PuTTY – SSH Client for Windows
Pageant – SSH agent for Windows
