This article will guide you through the installation and configuration steps for Putty.
The procedure mentioned in this tutorial is tested on:
| OS | Windows 7 |
(I) What is PuTTY?
PuTTY is a free and open-source terminal emulator, serial console and network file transfer application. It supports several network protocols, including SCP, SSH, Telnet, rlogin, and raw socket connection. PuTTY was originally developed by Simon Tatham for the Windows platform, but it has been ported to various other operating systems. Official ports are available for some Unix-like platforms.
(II) Installation Steps:
a) PuTTY is part of Putty Installer package which can be downloaded from link.

b) OR it can also be downloaded separately as well from link.

(III) Starting and Configuring PuTTY:
a) Go to Windows-Start -> All Programs -> PuTTY -> PuTTY.

b) Following screen would appear once Putty starts.
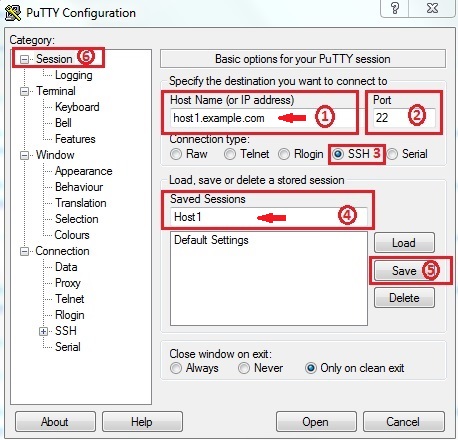
(1) Enter the host name OR IP address in the “Host Name” field.
(2) SSH by default listen on “Port” 22 (Change it in case your SSH Server is running on different port other than 22).
(3) Leave “Connection Type” as Default (SSH).
(4) Then name the session using the “Saved Sessions” field.
(5) Save the session using the “Save” Button.
(6) All the session related setting comes under “Session” Category.
Note: (*) To access this session in the future, you can simply double-click the session name in the list-box.
c) Now we need to entry UserName by which the user will login to server.
Select “(Category) Connection -> Data” and type your username into the “Auto-login username” field, then return to the “Session” category and save your settings.

d) (Optional Step) In case your server accept Key based authentication, then in that case you need to follow one more step.
Select “(Category) Connection -> SSH -> Auth” there is a field on this screen asking for the “Private key file for authentication“, browse it and specify the path of Putty Private Key File (.ppk), then return to the “Session” category and save your settings.

Note: (*) You can generate/convert OpenSSH Private Key to Putty format using PuTTYgen, please check my PuTTYgen Blog Post.
e) Once you have save your session, now is the time to connect Server machine using “Open” Button, as shown below:

f) First time when we connect to the server, it ask to verify the identity of server. Select “Yes” to continue.

g) Finally after verifying the server, you will be logged on new server, as shown below:

Related Posts:
PuTTYgen – Putty (SSH) Key Generator for Windows
Pageant – SSH agent for Windows
